How to use  Calendar Plus
Installation
If you’re ready to install  Calendar Plus by
 ![]() automagical.work and you haven’t already done so, you can do so by following the steps below:
automagical.work and you haven’t already done so, you can do so by following the steps below:
Click the install button
You may need to talk to your monday.com account administrator to have Calendar Plus installed in your account.
Select workspaces and review permissions
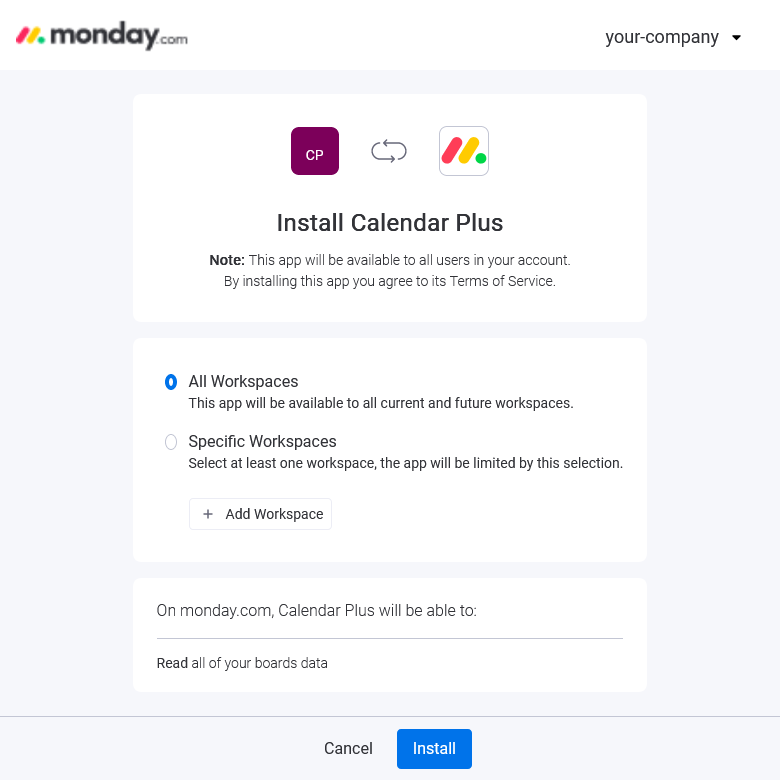
Select which workspaces you would like to make Calendar Plus available in, make sure to review the scope of access the calendar needs, and press install.
Start using Calendar Plus
monday.com will now add the Calendar Plus view to your account. Continue with the next section to learn how to add the calendar to your board.
Adding Calendar Plus to your board
Once Calendar Plus has been installed in your monday.com account, you can start using it right away. You can add the calendar to any board by following these steps:
Navigate to a board
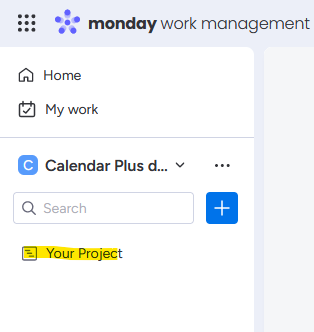
Navigate to the board you want to add the calendar to.
Find the Calendar Plus view
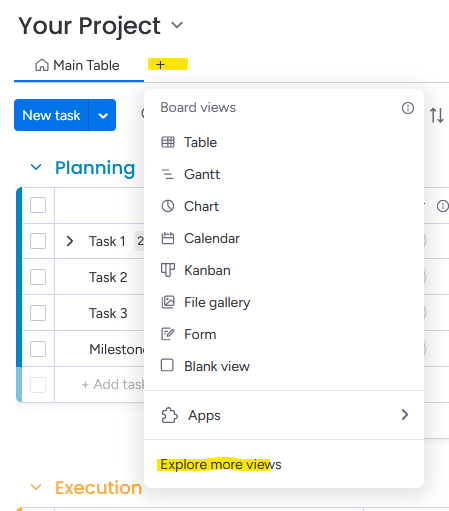
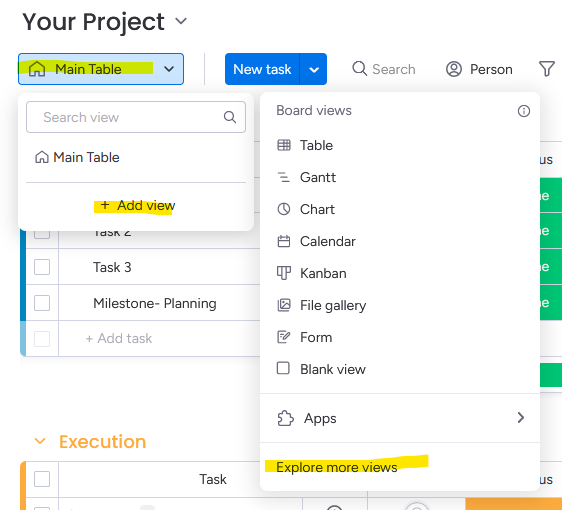
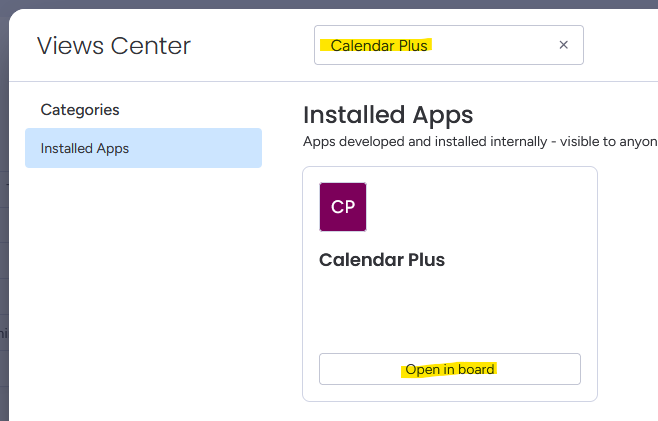
Find Main Table, and then click the plus sign (+) or Add view, and then Explore more views. Enter Calendar Plus in the search bar. Select Open in board.
Configure your Calendar Plus view
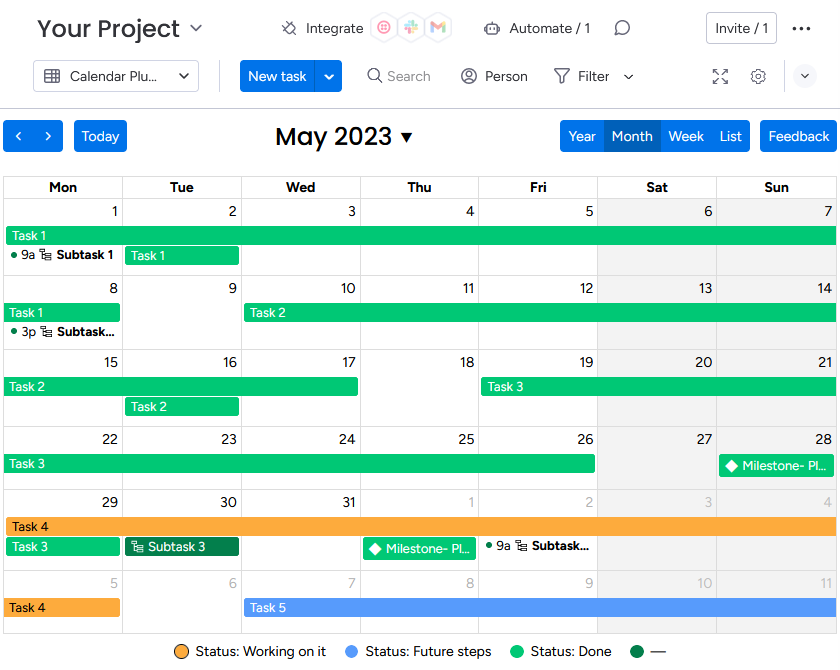
monday.com will now add the Calendar Plus view to your board. Continue with the next section to learn how to configure the calendar.
Configuring Calendar Plus
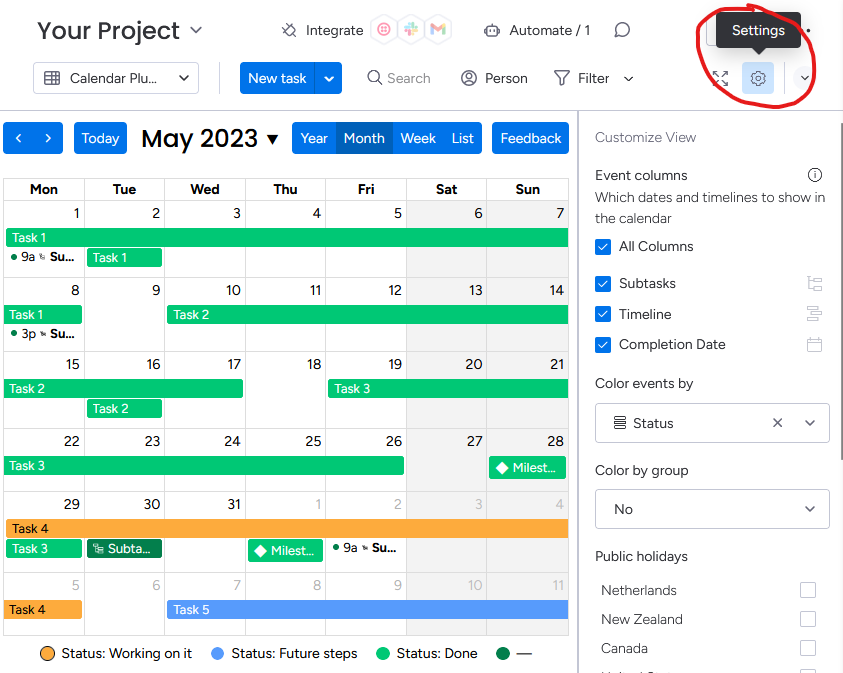
Calendar Plus has many settings that you can adjust to make it work just the way your team wants. To access these settings, click on the cog wheel (⚙️) in the top right corner of the calendar view.
The chapters below document the disparate settings you can adjust to make Calendar Plus work for you.
Event columns
Calendar Plus can display events in the calendar based on a variety of columns in your board: date columns, timeline columns, and subitems (see limitation below). By selecting one or more event columns, you can control which events are displayed in the calendar. Showing multiple event columns is a Pro feature.
- Date column values are displayed as all-day events when no time is specified. When a time is specified, the event is displayed as a timed event.
- Timeline column values are displayed as a multi-day event, spanning the duration of the timeline. If your timeline is a milestone, it is marked with a diamond (◆).
- Subitems are displayed just like regular items (see limitation below). They will also show the name of their parent item. You can turn this off in the event settings. Subitems are part of our Pro plan.
Only the leftmost date or timeline column of your board's subitems is taken into account and used to display your subitems.
Color by
This setting was called Color by group in earlier versions of Calendar Plus.
The Color by and Color by column settings determine how events are colored.
| Value | Effect |
|---|---|
| Start date column | Creates a new color for every start date or timeline column you’ve selected for display in the calendar. |
| Column | Colors your events by the Color by column column you can select below. |
| Group | Event colors follow the group the item belongs to. |
| Column + Group | Creates a new color for every group and Color by column column value combination. |
| Board | (Dashboard only) Creates a new color for every board you’ve selected for display in the calendar. Requires at least one item from the board for the color to be displayed in the legend. |
Color by column
This setting was called Color events by in earlier versions of Calendar Plus.
This setting determines which column is used to color events in the calendar. You can choose from any of the columns in your board, including status columns, text columns, and dropdown columns.
For this setting to have any effect, you must have selected Column or Column + Group for your Color by setting. See above.
Public holidays
This setting enables you to display public holidays in the calendar. At the time of writing, you can choose from 230 world countries.
First day of the week
This setting determines which day is considered the first day of the week in the calendar.
Calendar functionality
Now that you have configured Calendar Plus to you and your team’s liking, you can start using it to manage your team’s work. You can perform the following actions in the calendar:
Navigate the calendar
- Use the arrow buttons located in the top left of the toolbar to navigate to the next time period.
- Click Today to jump back to today’s date.
- Use the date picker to navigate quickly to a time in the past or future. Click the current time period in the center of the toolbar to open the date picker.
- View your events per year, month, week, day, or as a list by selecting the appropriate mode from the top right of the toolbar.
Filter your view
Use the Search, Person, and Filter facilities provided above the calendar to filter down the events you want to see in the calendar.
Add and edit events
To add new events, click or drag any empty space in the calendar. Alternatively, use the New button near the top left of your screen to add new events to your calendar.
To edit events, either drag and resize events, or click on the event in the calendar to edit any of its columns.
To open a subitem's parent item, use Alt-LeftClick (Windows) or Option-LeftClick (macOS) and click on the subitem to open its parent item.
Event duration
Calendar Plus also supports event durations by way of a second date column. To give events a duration, just resize it by dragging the end of the event down. Alternatively, you can click the settings icon at the top right of every event. A screen will appear to configure which column contains the end time.
To remove the duration from your events, you can clear the end time column via the settings icon at the top right of every event.
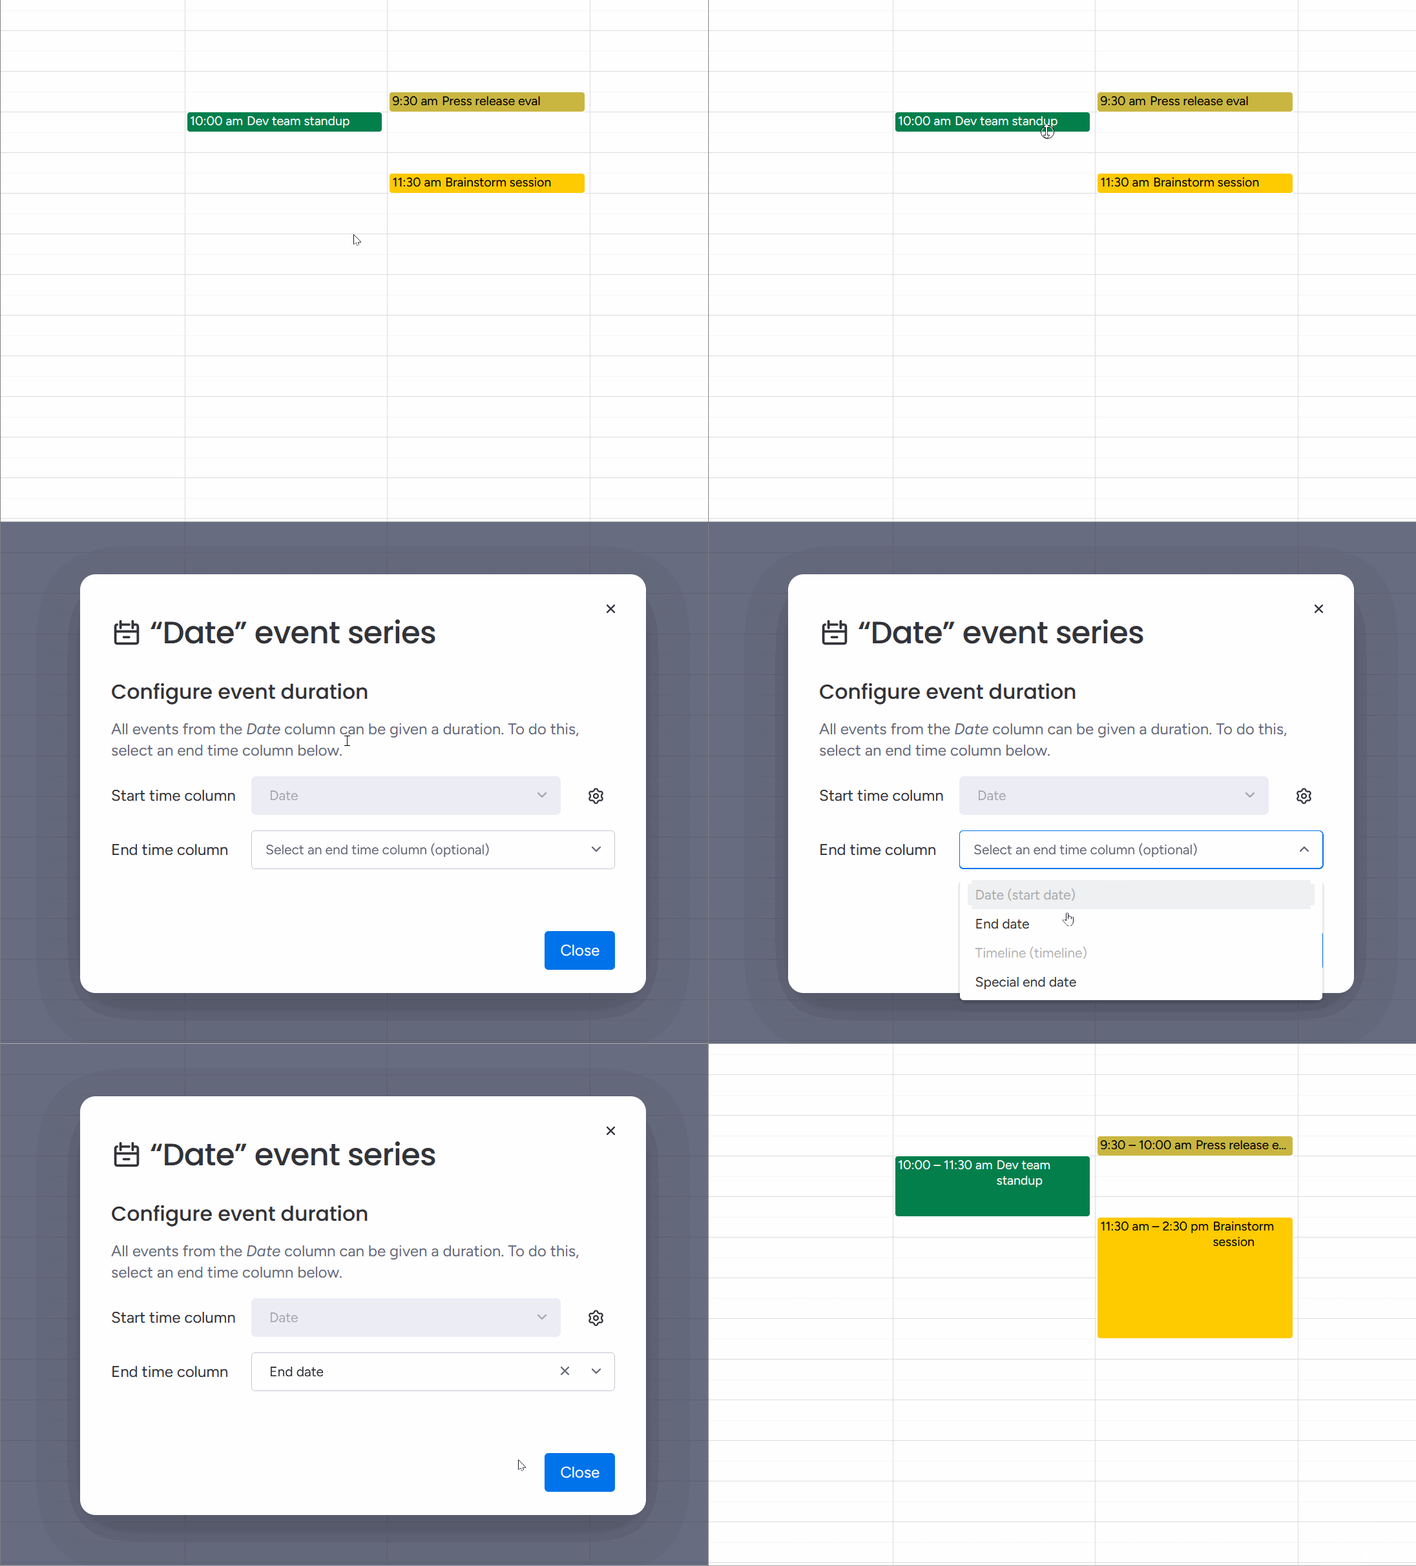
Note that configuring event duration is only available from month, week, and day views and setting an end time column will do so for all events with the same start column.
View people's avatar in calendar item Pro
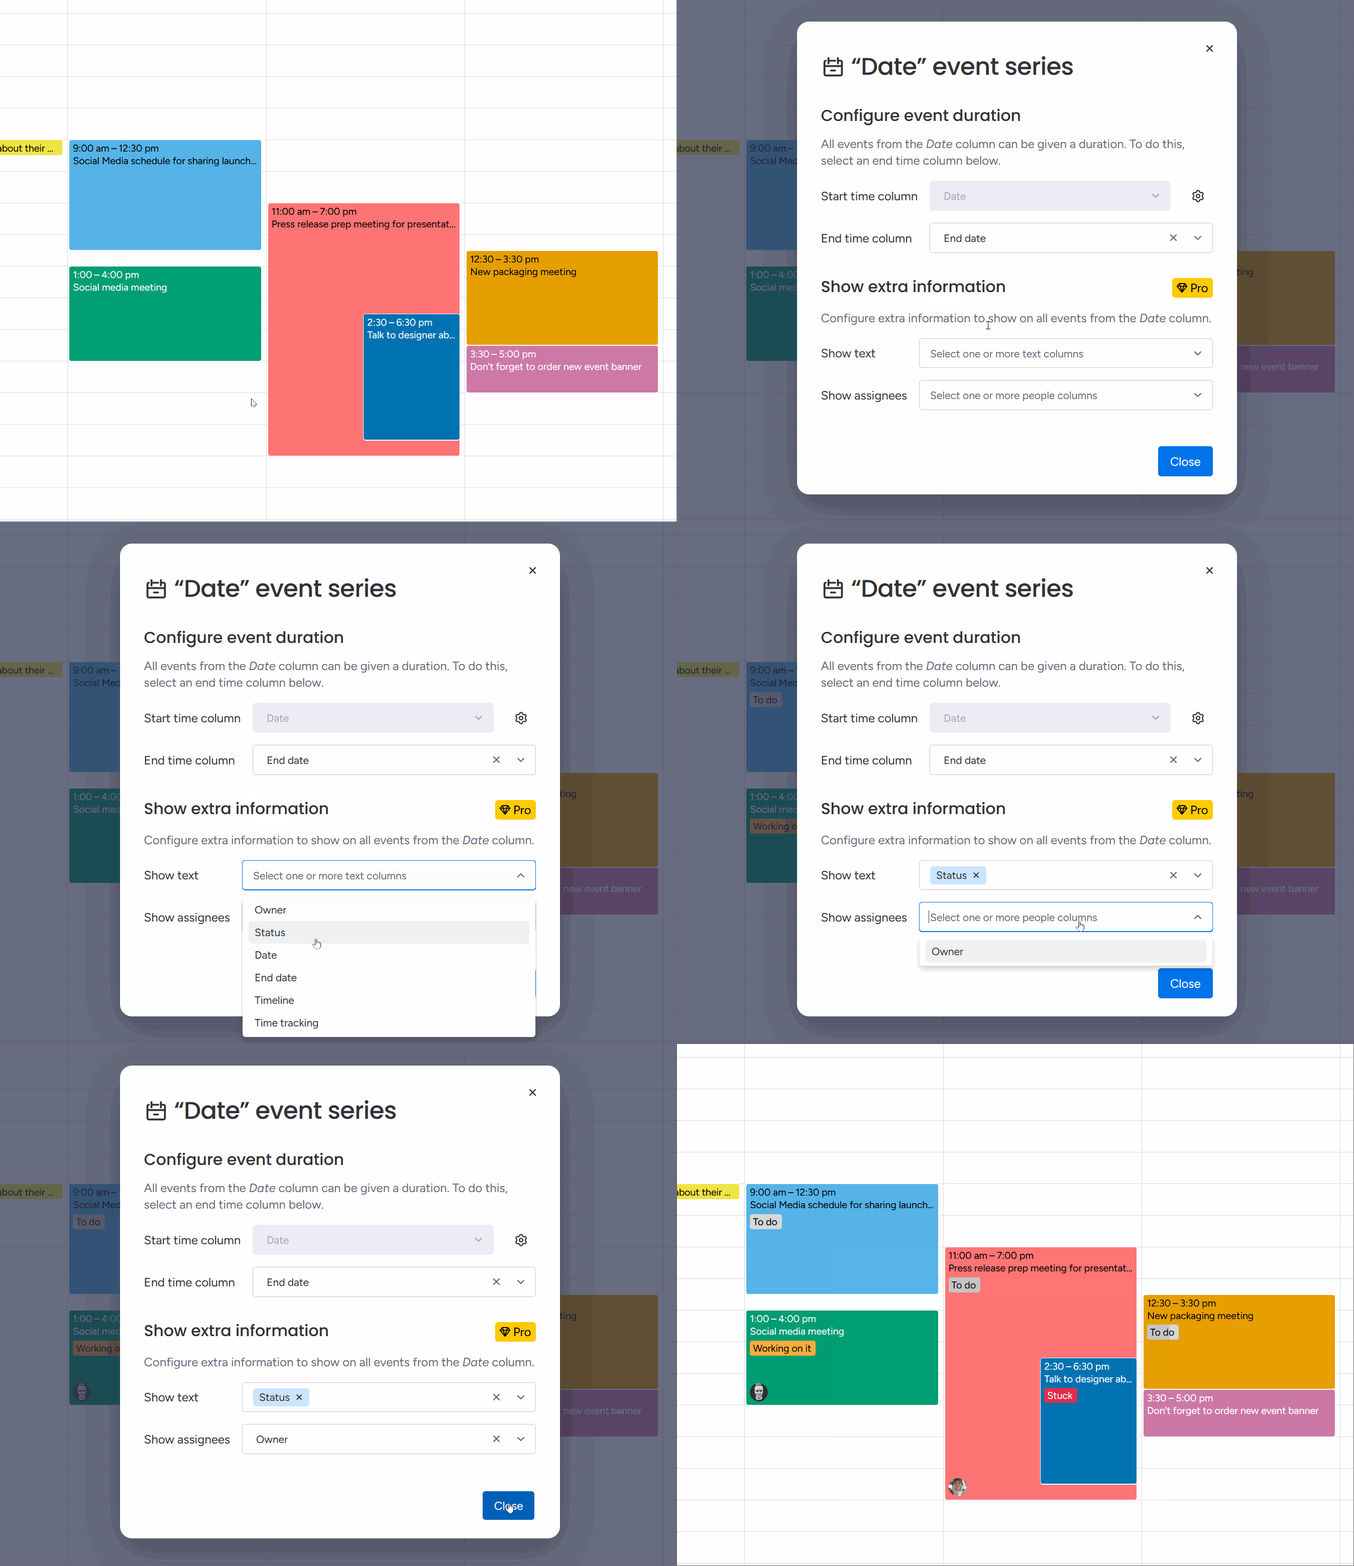
Add people's avatars to your items by opening the event settings, here you can choose a people column to show on the item. The week view shows a maximum of 3 people and the list view shows a maximum of 10 people. People are not visible on month or year view at this moment. This feature is part of our Pro plan.
See extra info in calendar items Pro
To add more information to your calendar item in week view or day view, open the event settings and select the column you would like to use for extra information like a location or status. This information is only visible in the week view or day view of the calendar. This feature is part of our Pro plan.
View the color legend
The color legend is located near the bottom of the calendar. This legend shows you what each color in the calendar represents.
Calendar sharing Ultimate
Calendar Plus supports sharing your calendar outside monday, and embedding it on your website.
- Share with your coworkers — Report to C-level with an easily accessible link to your planning, or share your work load with that department that doesn’t use monday.
- Embed on your website — Keep your website visitors up to date, link to resources or forms, the possibilities are endless. Paste the embed code in a HTML code block on your website and you’re good to go.
- Access on the go — Share your calendar with your colleagues out in the field, or access it yourself when you’re on the go. All through a simple link or an internet calendar subscription.
- Save on seat costs — No need to invite more people to your monday account than is absolutely necessary. There’s no limit on the number of people you can share your calendar with.
At this time, there are also a few limitations:
- Only the board view can be shared. The dashboard widget cannot be shared.
- Board view filters can not be used together with a share. All items are shared.
- The internet calendar feed is limited to 2,000 items.
- The internet calendar feed update frequency is determined by your calendar application.
A few simple steps are involved in sharing your calendar:
Connect your calendar
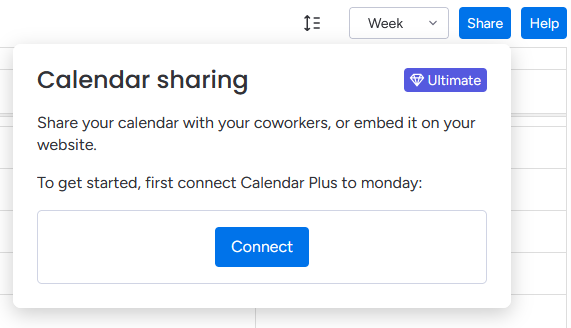
To get started, click the Share button in the top right of the calendar view. Then, click the Connect button in the top right of the calendar view.
Sign into monday
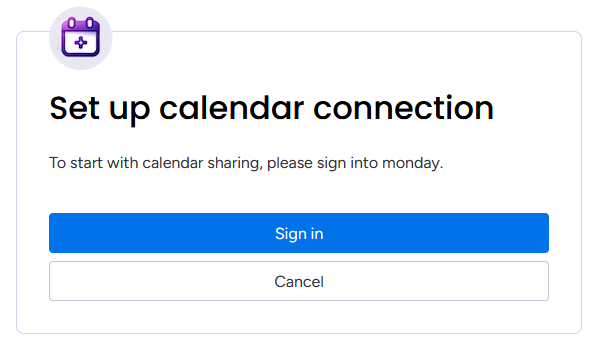
After clicking Sign in, you’ll be redirected to monday.com to sign in and authorize Calendar Plus to access your calendar.
Finish connecting
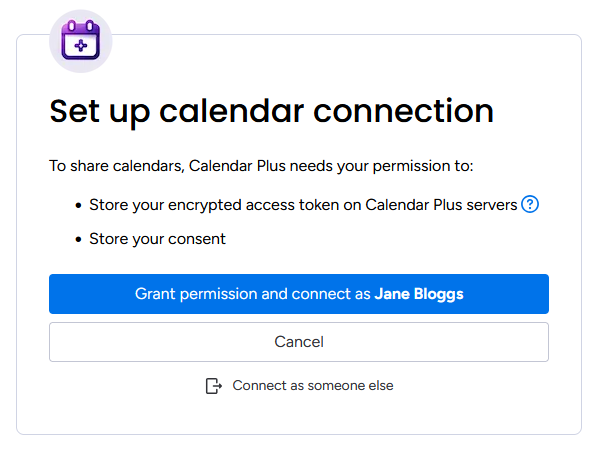
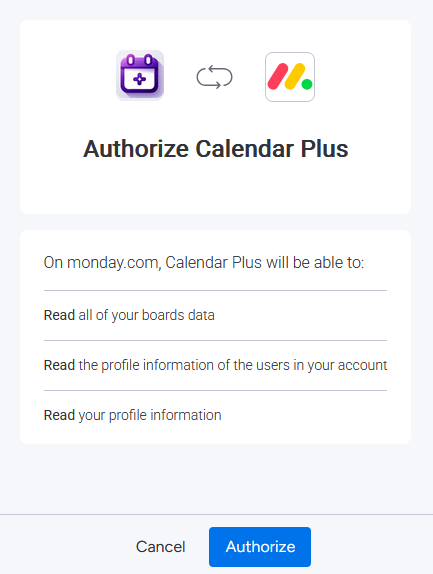
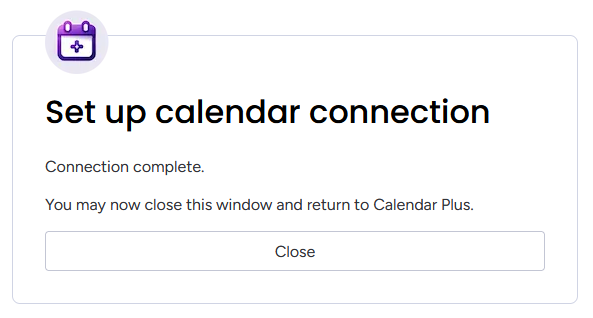
Once you’re signed in, grant permission to connect your calendar. Once connected, you’ll be prompted to close the window and return to the calendar.
Start sharing
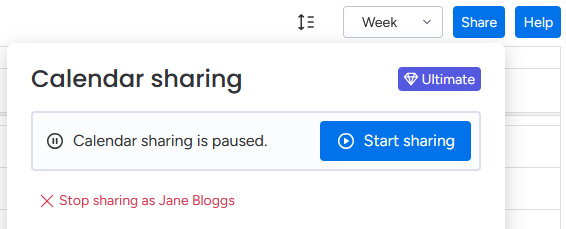
Click the Start sharing button in the top right of the calendar view. Copy the link to share the calendar with your coworkers, or copy the embed code to embed the calendar on your website.
Update frequency
Any changes you make to your calendar may take up to 5 minutes to update on the shared calendar. If after 15 minutes you’re still having trouble seeing changes you made to the calendar, please reach out to us.
If you’re using the internet calendar feed, the update frequency is determined by your calendar application. See Feed update frequency
Sharing a link
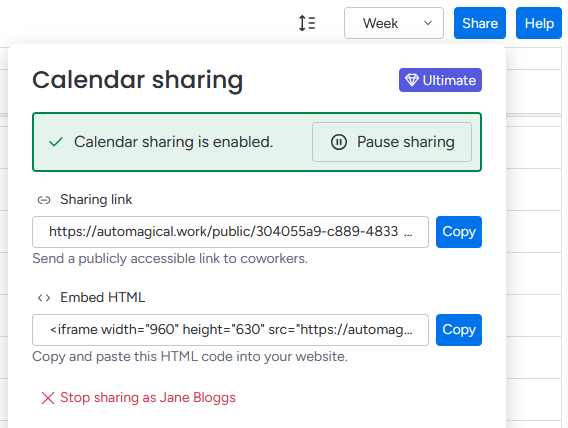
To share a link with that department that doesn’t use monday, or with an external collaborator, copy the Sharing link and send it via your preferred method.
Subscribe using your calendar app
Copy the internet calendar feed link and use it to subscribe to the calendar using your favourite calendar provider.
You can find the internet calendar feed link in the Share dialog.
Feed update frequency
If you’re using the internet calendar feed, the update frequency depends on your calendar provider. While we request the provider update the feed every 5 minutes, providers set their own update policy.
| Calendar | Update frequency |
|---|---|
| Google Calendar | Approx. every 1–10 hours |
| Classic Outlook for Windows | Approx. every 7 hours |
| New Outlook for Windows | ⚠️ Does not update internet calendars! |
| Apple Calendar for iOS | Every few hours after opening the app. Drag down the calendar sidebar to force an update. |
| Fastmail Calendar | Approx. every 30–60 minutes |
Embedding the calendar on your website

To embed the calendar on your website, copy the Embed code and paste it into your HTML code block.
To change the size of the calendar, adjust the width and height (in pixels) of the embed code. To make the calendar fill the entire width of your website, set the width to 100%.
Showing the calendar to Viewer-level users
To make the calendar available to Viewer-level users, start by adding a Blank view to your board. Then, add an Embed everything widget, and configure it to use the sharing link. Viewer-level users will now be able to see the calendar in monday.
Weather automations Pro
With the addition of new automations, Calendar Plus makes it possible to integrate the weather forecast into your boards and calendars. Keep yourself and your team informed of the weather situation so you can plan and reschedule accordingly.

Learn how to set up Weather
To set up the calendar to track your jobs and the weather forecast, you can follow these steps:
Prepare your board
Ensure your board has the following columns:
- A start date/time and end date/time for your jobs.
These will be used to display your jobs in the calendar, and sets the date and time for the weather forecast. - A location column for the job location and weather forecast location.
- A text column to hold the weather forecast.
Set up weather automations
In the automation centre, select Templates, and search for “Weather”.
Set up these three recipes:
- Every time period forecast all items' Weather at Location on Start date and update Weather forecast.
- When Location changes forecast the weather at Location on Start date and update Weather forecast.
- When Start date changes forecast the weather at Location on Start date and update Weather forecast.
Next time these automations run, they will update the weather forecasts for your jobs.
Show your jobs in the calendar
Enable your start date/time column via the calendar settings ⚙️ on the top right.
Configure event duration
Configure your event’s duration by dragging the bottom edge of one of your jobs, or by clicking on the settings icon on the top right of an event. This opens the event series configuration dialog.
Select an end time column to set the duration of the event.
Display the weather forecast on your events
In the same dialog, choose your weather column under Information at a glance. This will display the weather forecast for the job location in the calendar.
You may need to wait until the next time the automations run to see the weather forecast.
All done! 🎉
At the moment, Calendar Plus supports a temperature (°F/°C) and conditions forecast for up to 2 days in the future. If you need to forecast further into the future, or you need to know about wind conditions, precipitation, or other weather-related information, please reach out to us at [email protected].
Conclusion
You now know how to install, add, and configure  Calendar Plus by
 ![]() automagical.work. You also know how to navigate the calendar, filter your view, add and edit events, and view the color legend.
automagical.work. You also know how to navigate the calendar, filter your view, add and edit events, and view the color legend.
If you have any questions or need help, don’t hesitate to reach out to us here.